Disclaimer: While there are links to the products I used, I do not get paid to post them, but I put the links for the convenience of my readers.
Extra Disclaimer: Some of the pictures that I used are not my own, and if they aren't my own, I put the link to the source that I found them at below the picture.


The next step with using
the leather sponge and the daubers to apply the actual leather stain. I chose
Moccasin Brown color leather dye, because I didn't want a necessarily deep
brown color, especially since the nailheads on the chairs were a darker color,
but I wanted more of a medium brown, with maybe a light red hint to it. It
definitely had a very faint hint of red to it, which I loved, but it was much
darker than anticipated. Online, this is what Moccasin Brown is supposed to
look like:

Extra Disclaimer: Some of the pictures that I used are not my own, and if they aren't my own, I put the link to the source that I found them at below the picture.
We interrupt our
normally scheduled remodeling posts to bring you a décor post! And not just any
décor post, but one about #StainingLeather. When I went home (good ole #KCMO)
back in January 2016, we did a siblings’ lottery, where we were lucky enough to
go through our parents belongings and pick items that we wanted, which was like
hitting the actual lottery for me and the hubs since we had a blank canvas
house that needing painting (i.e. furniture).
Since I was a little
girl, I always loved my parents giant leather chairs, with a matching ottoman,
that sat in our living room area, so I knew I had to have them.
However, I forgot that our living room had a bunch of windows, so when
I saw them, they were – well, disgusting, to say the least. They were stained. They
were sun-bleached. They were just gross, no way around it... as much as I hated
to admit it. Nevertheless, I wasn’t letting these bad boys go. My little #DIY
brain had plans for them.
I believe if it’s got good bones, it’s worth saving… It
might take some googling and Pinteresting to figure out how to save them, but
good bones = saving.
I got them into our
house, and immediately, Nick hated them. "They're pink", "They
stained", "They're gross"... Um, excuse you sir, they'll be
#fabulous when I'm done with them – or at least, I hoped.
First, it was obvious to
me that they needed to be stained again. Badly. No doubt about it. But how? I
had never stained #leather before, and most importantly, I've never even really
worked with leather in general. So what did I do? I google searched about
staining leather and I came across #Fiebings Leather Dye.I read some #Amazon
reviews to build my confidence before gathering my supplies, which included:
- Tandy Leathercraft Giegins Deglazer Quart $22
- Fiebing's Leather Dye in Moccasin Brown x2 $33
- TandyLeather Factory Wool Daubers, 5-inch, 10 pack $3.86
- Fiebin'sAcrylic Resolene Leather Finish Protectant - 4 ounces, Neutral $7.01
- 2 spray bottles from Dollar Tree $2
- Softhand brush $10.79
- Leathersponge $6.95
Total: $118.61 for
supplies
(You don't have to buy
the hand brush or the leather sponge, if you don't want to, you could use a
cloth or a cut up t-shirt, but I opted for the traditional route to ensure they
were done correctly. I will say, the sponge was super helpful,
but the brush you can easily opt out of purchasing)
Now let’s discuss what
the supplies do, and the order in which you should be using them (make sure to
do this outside, because the fumes are no joke):
- Wipe down the leather with a cloth to remove the dust from the furniture, before applying the #deglazer
- The deglazer is used to strip any other dyes previously on the leather, along with cleaning the leather, so that the dye properly adheres to the leather.
- Use a spray bottle with plain water (I used cold water, in case you were curious) to wet the leather, because once leather is wet, it opens up the leather's pores to hold the dye to the material, so this is a very important step. Do not soak the leather, but more dampen it enough to let the water do its job. Also, work in small areas, because the water can dry out of the leather pretty fast (especially in Houston heat, but don’t we all?).
- Shake up the dye before applying it to a cloth and moving it in large strokes to move the dye around on the leather, and for the nooks and crannies, use the wool #daubers to apply the dye correctly. You also need to wear latex gloves – this is an important step – otherwise, your hands are dyed for days, and some people suggest wearing two layers of gloves to be safe, which is why I did.
- After you apply the dye to an area, before moving on to the next area, use a different cloth to wipe off the excess dye.
- Once you’ve done one full coat of dye to the leather, before applying another coat of stain to the leather, you must let the stain dry, which usually takes about 1 1/2 to 2 hours between coats.
- Lastly, you apply the #resolene finish through using a different water bottle. The resolene helps waterproof and protect the finished product, but it also seals the dye so it won't come off on your clothes, which is super important (obviously). Spray the resolene on the stained leather, and then use a damp, clean cloth to spread the finisher over the leather evenly, using long strokes again (don’t skip this part, otherwise, it’ll be shiny).
I read reviews about the resolene, and a lot of people warned that
"a little goes a long way", plus, they said that too much resolene
gave them that shiny leather finish, which is not what I was wanting for these
chairs.
Now that the basic
instructions and the why we need them has been covered, let's get into me
actually doing this project. I opted for the ottoman first because,
technically, if I ruined it, the ottoman wasn't a big loss... Technically. So I
said a little prayer to the DIY gods, and got to work deglazing.
The instructions called
for me to use a soft hand brush or soft cotton cloth, rub the deglazer into the
leather until absorbed. Wipe off the surplus and apply the dye afterwards (not
recommended for man-made leathers). Just so we're clear, there's almost never a
surplus - or at least there wasn't how I was doing it. I opted to use a hand
brush to rub the deglazer into the leather chairs, in order to make sure it
really worked into the leather. So I poured the deglazer onto a paper plate,
dipped my hand brush into the deglazer, and then began brushing it in long
strokes over the leather.
Pretty sure deglazer is
just a super fancy word for "acetone". I've read online about a lot
of people actually using acetone to clean the leather before their projects,
and that doesn’t surprise me, because the deglazer I got definitely smells of
acetone. Anyway, the brush method worked at times, and then other times, I
ended up with a big wet looking spot on the ottoman, which meant I had to
deglaze a couple times to even everything out.
So here's what the
ottoman looked like after the deglazer had dried: Lighter than the sun-bleached
leather, but not by much (see my wet spots of using too much deglazer?).
 |
| Picture Source |
By the way, absolutely
did not come out that color... So much darker. Like black. Like,
in certain lighting (or at night) it looks black, but during the daytime and
with sunlight, it’s a rich dark brown with slight red undertones. So rule of
thumb: you can always layer for a darker outcome in color, but you can't take
away darkness. Realistically, I should've done Light Brown and done in layers
to make it the medium brown that I was hoping to achieve... But the ottoman is
dyed, so too late now #CaptainHindsight
Either way, I got a
squirt bottle full of plain water (I used cold water from the tap) and misted
the entire ottoman... And when they warn you leather absorbs water fast, they
weren't kidding, which is why I advise you to work in small sections – maybe
mist it all over in the beginning, but then smaller sections as you actually move
to staining. I worked on one side/area at a time, spraying and then sponging
the dye on. Spraying and sponging. My advice if you have nail heads, or other decorative
pieces on the furniture, which create nooks and crannies, go around them first
with the daubers and then do the main area with the sponge.
Here's what the ottoman
looked like after the first coat of stain had dried:
I wanted the color of
the chairs and ottoman to be more even, obviously, so that meant I needed to
apply another coat of stain after the first coat was fully dried
(I waited half a day to do another stain, but a lot of people say an hour to an
hour and a half, so at least wait two hours to be safe). This obviously would
make the ottoman even darker (again, choose a lighter color and layer), but I
needed a more even layer on the ottoman.
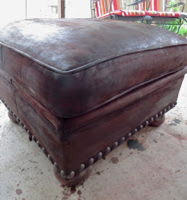
This is the ottoman
after the second layer: more even, but not quite what I was expecting. However,
I had built my confidence up to do the chairs, and even though I wish that the
ottoman could’ve been evened out more in color, I was nervous that a third
layer would make them black, and I was scared I would run out of dye, so I
moved on to the resolene step.
The next step was to
carefully put a thin layer (repeat: thin) of the resolene on the ottoman to
give it that protected finish. The instruction called for either using a spray
bottle or a sponge, but since I was warned a little goes a long way and to do a
thin layer, I opted for the spray bottle and a clean cloth wipe over method.
All in all, not bad huh?
I was actually pleasantly surprised by how everything turned out, and most
importantly, I'm in love all over again. Seriously.
I reordered more dye and
decided to tackle a chair to see if it would turn out the same as the
ottoman... To which, this is when I found out the dye being such a
"special" color, they turn out differently. My chair came out black
(guess I could’ve done that third layer on the ottoman). However - and luckily
- they still looked amazing! Just the wrong color. Again, and cannot stress it
enough, always go lighter with the intention of layering for depth.
Either way, they're
luxurious and beautiful again, especially since they are so dark... and here’s
the kicker: Nick was extremely impressed. HA! He even said: "I was
thinking about putting them in our room now". Oh okay Mr.
Skepticism-in-the-beginning.
So, color me super
impressed with myself. Seriously. Check out the #BeforeAndAfter photo below
(please excuse the lack of cushion on the after photo, I was still in the
process of dying it):


Let
me know your thoughts and/or feelings on my staining adventure, and next up, updating the princess room AKA the hot pink and sparkly room (yes, you read that right. They. Put. Sparkles. In. The. Paint)
Sarah
#MeAndVinny
Comments
Post a Comment
Want to show us some love? Have an opinion on how we could've done it better? Got a question? Leave a comment below, because we'd love to hear from you.